Hi all,
Please do these activities when you have time, its a long activity and i would suggest do all activities in one go. So be clam and lets start.
I have installed NAV 2013 and its work great with my windows credentials.

I was checking the service console (Microsoft Dynamics NAV Administration) in NAV 2013 and found out that Credentials Type have multiple Options.
1) Windows (we use this as default and its works fine when we install default NAV 2013. We are using same after release of NAV 2009).
Other Options are - UserName, NavUserPassword and AccessControlService.
First of create a user under Administration/IT Administration/General/Users. As shown below how to create it.

I use UserName as TEST and Password as Manager@1. Provide Super Role to the Test User.
You will encounter with an error message when you try to save the Login as shown below.

Just click ok, we are getting this error because we haven't changed the service file yet.
Let's try to use the second option that is NavUserPassword in this article. All steps remain same for UserName too.
First of all i will change the Credentials Type in Service Console of NAV 2013 by editing the service as shown below.

After that try to stop and start the service. You will encounter with an error message -
Server Instance 'MicrosoftDynamicsNavServer$DynamicsNAV70' failed to reach status 'Running' on this server due to the following error: 'Time out has expired and the operation has not been completed.'. Additional information may be in the event log of the server.

I checked the event viewer and here is what the detailed error i got -
Server instance: DynamicsNAV70
Session type: UnknownClient
Session ID: 0
User:
Type: Microsoft.Dynamics.Nav.Types.NavConfigurationException
SuppressMessage: False
FatalityScope: None
Message: The required certificate thumbprint is not specified. Specify a valid value for the ClientServicesCertificateThumbprint configuration setting.
StackTrace:
at Microsoft.Dynamics.Nav.Types.CertificateValidator.ValidateCertificateThumbprint(String thumbprint)
at Microsoft.Dynamics.Nav.Types.CertificateHelper.GetCertificateFromThumbprint(String certificateThumbprint)
at Microsoft.Dynamics.Nav.WindowsServices.NavServerWindowsService.CreateServiceHosts(ServerUserSettings settings, Boolean usePortSharing, String machineName)
at Microsoft.Dynamics.Nav.WindowsServices.NavServerWindowsService.OnStart(String[] args)
Source: Microsoft.Dynamics.Nav.Types
HResult: -2146233088
It says that we need to specify ClientServicesCertificateThumbprint in the Service. Lets try to find where we need to specify it. I opened the service console and under client service i can see the Certificate thumbprint as shown below.

Let try to specify a value for the same.
Prerequisites -
1. Microsoft Management Console (MMC).
2. The makecert.exe utility.
If you do not already have this (MMC) snap-in installed, then follow these steps:
1. Choose Start, choose Run, and then type Mmc.exe.
2. In the console, on the File menu, choose Add/Remove Snap-in.
3. In the Add Standalone Snap-in dialog box, select Certificates, choose Computer Account, choose Local Computer, and then choose Add.

The makecert.exe utility is installed with Microsoft Visual Studio and Microsoft Windows SDK.
To create a root CA and a private key file by using the makecert.exe utility.
1. On the computer running Microsoft Dynamics NAV Server, create a temporary folder to use when you work with certificates.
2. Open the command prompt as follows:
If you have Visual Studio installed on your computer, choose Start, choose All Programs, choose Microsoft Visual Studio 2010, choose Visual Studio Tools, and then right-click Visual Studio Command Prompt and choose Run as Administrator.

3. Type the following command.
makecert -n "CN=RootNavServiceCA" -r -sv RootNavServiceCA.pvk RootNavServiceCA.cer
When you are prompted, enter a password. You need this password to create the service certificate.
The RootNavServiceCA.cer certificate file and the RootNavServiceCA.pvk private key are saved in your temporary folder.
To use the Certificates snap-in to install the root CA on the computer running Microsoft Dynamics NAV Server -
1. Start the Certificates snap-in for MMC on the computer running Microsoft Dynamics NAV Server, and then add the Certificates snap-in. [Already Done]
2. In the Certificates snap-in dialog box, choose Computer account, and then choose Next.[Already Done]
3. In the Select Computer pane, choose Local computer: (the computer this console is running on), and then choose Finish. [Already Done]
4. Choose OK to close the Add or Remove Snap-ins dialog box. [Already Done]
5. In the left pane of MMC, expand the Certificates (Local Computer) node.
6. Expand the Trusted Root Certification Authorities node, right-click the Certificates subfolder, select All Tasks, and then choose Import.
7. In the Certificate Import Wizard, on the Welcome page, choose Next.
8. On the File to Import page, choose Browse.
9. Browse to the location of the RootNavServiceCA.cer certificate file, select the file, and then choose Open.
The default Location is C:\Windows\SysWOW64\RootNavServiceCA.cer.

10. On the File to Import page, choose Next.
11. On the Certificate Store page, accept the default selection, and then choose Next.
12. On the Completing the Certificate Import Wizard page, choose Finish.
13. The RootNavServiceCA certificate is now visible in the list of trusted root CAs.
14. You now create a certificate revocation list for the root certification authority and then install the certificate revocation list on the computer running Microsoft Dynamics NAV Server. A certificate revocation list is required because WCF applications check the revocation list when validating certificates.
To create a certificate revocation list for the root certification authority
At the command prompt, type the following command: (use same Visual Studio Command Prompt)
makecert -crl -n "CN=RootNavServiceCA" -r -sv RootNavServiceCA.pvk RootNavServiceCA.crl
When you are prompted, enter the password that you used to create the certificate.
To install the certificate revocation list on the computer running Microsoft Dynamics NAV Server -
1. In the Certificates snap-in, in the left pane of MMC, expand the Certificates (Local Computer) node.
2. Expand the Trusted Root Certification Authorities node, right-click the Certificates subfolder, select All Tasks, and then choose Import.
3. In the Certificate Import Wizard, on the Welcome page, choose Next.
4. On the File to Import page, choose Browse.
5. In the File Type field, select Certificate Revocation List (*.crl).
6. Browse to the location of the RootNavServiceCA.crl file, select the file, and then choose Open.

7. On the File to Import page, choose Next.
8. On the Certificate Store page, accept the default selection, and then choose Next.
9. On the Completing the Certificate Import Wizard page, choose Finish.
10. Select the Trusted Root Certificate Authorities node, and then refresh the snap-in.
A Certificate Revocation List folder that contains the RootNavServiceCA.crl file has been created.

To create and install a test certificate for the Microsoft Dynamics NAV Server computer -
1. At the command prompt, type the following command:
makecert -sk NavServiceCert -iv RootNavServiceCA.pvk -n "CN=NavServiceCert" -ic RootNavServiceCA.cer -sr localmachine -ss my -sky exchange -pe NavServiceCert.cer
This command specifies the subject’s certificate name as NavServiceCert. You need this certificate name when you configure the Microsoft Dynamics NAV Windows client or Microsoft Dynamics NAV Web Server components.
2. When you are prompted, enter the password that you used to create the root CA.
3. Select the Trusted Root Certificate Authorities node, and then refresh the snap-in.
To grant access to the certificate’s private key to the service account for Microsoft Dynamics NAV Server -
1. In the left pane of MMC, expand the Certificates (Local Computer) node, expand the Personal node, and then select the Certificates subfolder.
2. In the right pane, right-click the NavServiceCert certificate, choose All Tasks, and then choose Manage Private Keys.
3. In the Permissions for NavServiceCert private keys dialog box, choose Add.
In the Select Users, Computers, Service Accounts, or Groups dialog box, enter the name of the service account that is used by Microsoft Dynamics NAV Server By default, the service account is NETWORK SERVICE. Choose OK when done.

In the Permissions for NavServiceCert private keys dialog box, select the account, and then select the Allow check box next to Full Control. Choose OK when done.
In the right pane, double-click the NavServiceCert certificate.
In the Certificate dialog box, choose the Details tab, and then select the Thumbprint field.
Copy or note the value of the Thumbprint field. (Make Sure you only copy the value as the Thumbprint value have a space in the start as shown in image below)

Paste the value in service as shown below.

Start the service and walla service started succesfully.
Now let's try opening Role Tailored Client (Windows Client).
What the Hell we are getting an error saying - There is a communication protocol mismatch between the client and the server.

And the worst part is that there is nothing on the Event viewer also.
Oh! i missed one more configuration file that reside under users in c. Let's stop the service and open the ClientUserSettings file.
The path for file is - C:\Users\<user name>\AppData\Roaming\Microsoft\Microsoft Dynamics NAV\70
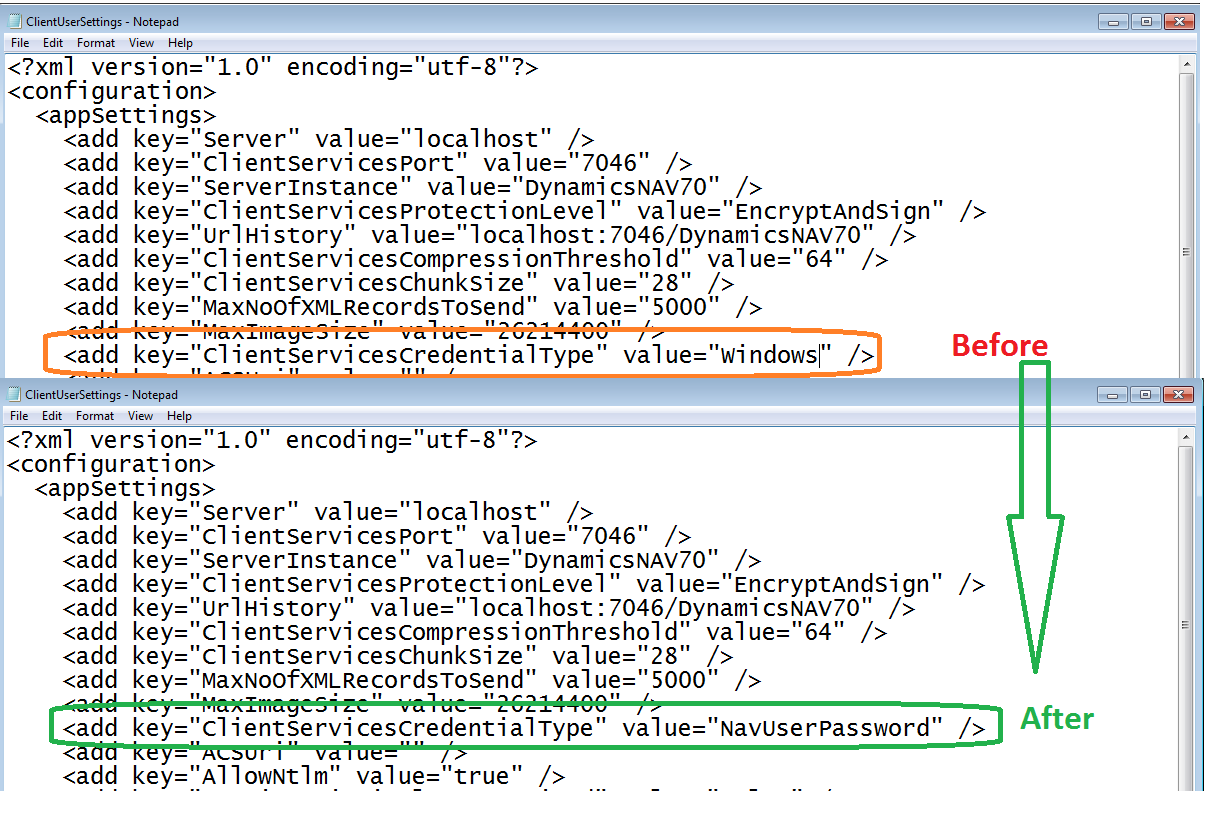
When i opened the file, i figured out that ClientServicesCredentialType is still windows. Lets try to change it to NavUserPassword.

Save the file, start the service and start the client.
Wow the RTC Client Connected and its asking for user name and password.

When i entered username and password, clicked ok. But what i am getting an error.

The error message also suggest the solution.It says we need to put the Certificate Name in DNSIDENTITY.
so where is it? It in the ClientUserSetting, open the file and enter the certificate name in the DNSIdentity Value as shown below.

Now lets start the client and its started successfully as shown below.

Reference: http://saurav-nav.blogspot.in/
Please do these activities when you have time, its a long activity and i would suggest do all activities in one go. So be clam and lets start.
I have installed NAV 2013 and its work great with my windows credentials.

I was checking the service console (Microsoft Dynamics NAV Administration) in NAV 2013 and found out that Credentials Type have multiple Options.
1) Windows (we use this as default and its works fine when we install default NAV 2013. We are using same after release of NAV 2009).
Other Options are - UserName, NavUserPassword and AccessControlService.
First of create a user under Administration/IT Administration/General/Users. As shown below how to create it.

I use UserName as TEST and Password as Manager@1. Provide Super Role to the Test User.
You will encounter with an error message when you try to save the Login as shown below.

Just click ok, we are getting this error because we haven't changed the service file yet.
Let's try to use the second option that is NavUserPassword in this article. All steps remain same for UserName too.
First of all i will change the Credentials Type in Service Console of NAV 2013 by editing the service as shown below.

After that try to stop and start the service. You will encounter with an error message -
Server Instance 'MicrosoftDynamicsNavServer$DynamicsNAV70' failed to reach status 'Running' on this server due to the following error: 'Time out has expired and the operation has not been completed.'. Additional information may be in the event log of the server.

I checked the event viewer and here is what the detailed error i got -
Server instance: DynamicsNAV70
Session type: UnknownClient
Session ID: 0
User:
Type: Microsoft.Dynamics.Nav.Types.NavConfigurationException
SuppressMessage: False
FatalityScope: None
Message: The required certificate thumbprint is not specified. Specify a valid value for the ClientServicesCertificateThumbprint configuration setting.
StackTrace:
at Microsoft.Dynamics.Nav.Types.CertificateValidator.ValidateCertificateThumbprint(String thumbprint)
at Microsoft.Dynamics.Nav.Types.CertificateHelper.GetCertificateFromThumbprint(String certificateThumbprint)
at Microsoft.Dynamics.Nav.WindowsServices.NavServerWindowsService.CreateServiceHosts(ServerUserSettings settings, Boolean usePortSharing, String machineName)
at Microsoft.Dynamics.Nav.WindowsServices.NavServerWindowsService.OnStart(String[] args)
Source: Microsoft.Dynamics.Nav.Types
HResult: -2146233088
It says that we need to specify ClientServicesCertificateThumbprint in the Service. Lets try to find where we need to specify it. I opened the service console and under client service i can see the Certificate thumbprint as shown below.

Let try to specify a value for the same.
Prerequisites -
1. Microsoft Management Console (MMC).
2. The makecert.exe utility.
If you do not already have this (MMC) snap-in installed, then follow these steps:
1. Choose Start, choose Run, and then type Mmc.exe.
2. In the console, on the File menu, choose Add/Remove Snap-in.
3. In the Add Standalone Snap-in dialog box, select Certificates, choose Computer Account, choose Local Computer, and then choose Add.

The makecert.exe utility is installed with Microsoft Visual Studio and Microsoft Windows SDK.
To create a root CA and a private key file by using the makecert.exe utility.
1. On the computer running Microsoft Dynamics NAV Server, create a temporary folder to use when you work with certificates.
2. Open the command prompt as follows:
If you have Visual Studio installed on your computer, choose Start, choose All Programs, choose Microsoft Visual Studio 2010, choose Visual Studio Tools, and then right-click Visual Studio Command Prompt and choose Run as Administrator.

3. Type the following command.
makecert -n "CN=RootNavServiceCA" -r -sv RootNavServiceCA.pvk RootNavServiceCA.cer
When you are prompted, enter a password. You need this password to create the service certificate.
The RootNavServiceCA.cer certificate file and the RootNavServiceCA.pvk private key are saved in your temporary folder.
To use the Certificates snap-in to install the root CA on the computer running Microsoft Dynamics NAV Server -
1. Start the Certificates snap-in for MMC on the computer running Microsoft Dynamics NAV Server, and then add the Certificates snap-in. [Already Done]
2. In the Certificates snap-in dialog box, choose Computer account, and then choose Next.[Already Done]
3. In the Select Computer pane, choose Local computer: (the computer this console is running on), and then choose Finish. [Already Done]
4. Choose OK to close the Add or Remove Snap-ins dialog box. [Already Done]
5. In the left pane of MMC, expand the Certificates (Local Computer) node.
6. Expand the Trusted Root Certification Authorities node, right-click the Certificates subfolder, select All Tasks, and then choose Import.
7. In the Certificate Import Wizard, on the Welcome page, choose Next.
8. On the File to Import page, choose Browse.
9. Browse to the location of the RootNavServiceCA.cer certificate file, select the file, and then choose Open.
The default Location is C:\Windows\SysWOW64\RootNavServiceCA.cer.

10. On the File to Import page, choose Next.
11. On the Certificate Store page, accept the default selection, and then choose Next.
12. On the Completing the Certificate Import Wizard page, choose Finish.
13. The RootNavServiceCA certificate is now visible in the list of trusted root CAs.
14. You now create a certificate revocation list for the root certification authority and then install the certificate revocation list on the computer running Microsoft Dynamics NAV Server. A certificate revocation list is required because WCF applications check the revocation list when validating certificates.
To create a certificate revocation list for the root certification authority
At the command prompt, type the following command: (use same Visual Studio Command Prompt)
makecert -crl -n "CN=RootNavServiceCA" -r -sv RootNavServiceCA.pvk RootNavServiceCA.crl
When you are prompted, enter the password that you used to create the certificate.
To install the certificate revocation list on the computer running Microsoft Dynamics NAV Server -
1. In the Certificates snap-in, in the left pane of MMC, expand the Certificates (Local Computer) node.
2. Expand the Trusted Root Certification Authorities node, right-click the Certificates subfolder, select All Tasks, and then choose Import.
3. In the Certificate Import Wizard, on the Welcome page, choose Next.
4. On the File to Import page, choose Browse.
5. In the File Type field, select Certificate Revocation List (*.crl).
6. Browse to the location of the RootNavServiceCA.crl file, select the file, and then choose Open.

7. On the File to Import page, choose Next.
8. On the Certificate Store page, accept the default selection, and then choose Next.
9. On the Completing the Certificate Import Wizard page, choose Finish.
10. Select the Trusted Root Certificate Authorities node, and then refresh the snap-in.
A Certificate Revocation List folder that contains the RootNavServiceCA.crl file has been created.

To create and install a test certificate for the Microsoft Dynamics NAV Server computer -
1. At the command prompt, type the following command:
makecert -sk NavServiceCert -iv RootNavServiceCA.pvk -n "CN=NavServiceCert" -ic RootNavServiceCA.cer -sr localmachine -ss my -sky exchange -pe NavServiceCert.cer
This command specifies the subject’s certificate name as NavServiceCert. You need this certificate name when you configure the Microsoft Dynamics NAV Windows client or Microsoft Dynamics NAV Web Server components.
2. When you are prompted, enter the password that you used to create the root CA.
3. Select the Trusted Root Certificate Authorities node, and then refresh the snap-in.
To grant access to the certificate’s private key to the service account for Microsoft Dynamics NAV Server -
1. In the left pane of MMC, expand the Certificates (Local Computer) node, expand the Personal node, and then select the Certificates subfolder.
2. In the right pane, right-click the NavServiceCert certificate, choose All Tasks, and then choose Manage Private Keys.
3. In the Permissions for NavServiceCert private keys dialog box, choose Add.
In the Select Users, Computers, Service Accounts, or Groups dialog box, enter the name of the service account that is used by Microsoft Dynamics NAV Server By default, the service account is NETWORK SERVICE. Choose OK when done.

In the Permissions for NavServiceCert private keys dialog box, select the account, and then select the Allow check box next to Full Control. Choose OK when done.
In the right pane, double-click the NavServiceCert certificate.
In the Certificate dialog box, choose the Details tab, and then select the Thumbprint field.
Copy or note the value of the Thumbprint field. (Make Sure you only copy the value as the Thumbprint value have a space in the start as shown in image below)

Paste the value in service as shown below.

Start the service and walla service started succesfully.
Now let's try opening Role Tailored Client (Windows Client).
What the Hell we are getting an error saying - There is a communication protocol mismatch between the client and the server.

And the worst part is that there is nothing on the Event viewer also.
Oh! i missed one more configuration file that reside under users in c. Let's stop the service and open the ClientUserSettings file.
The path for file is - C:\Users\<user name>\AppData\Roaming\Microsoft\Microsoft Dynamics NAV\70
When i opened the file, i figured out that ClientServicesCredentialType is still windows. Lets try to change it to NavUserPassword.
Save the file, start the service and start the client.
Wow the RTC Client Connected and its asking for user name and password.

When i entered username and password, clicked ok. But what i am getting an error.

The error message also suggest the solution.It says we need to put the Certificate Name in DNSIDENTITY.
so where is it? It in the ClientUserSetting, open the file and enter the certificate name in the DNSIdentity Value as shown below.

Now lets start the client and its started successfully as shown below.

Reference: http://saurav-nav.blogspot.in/
Regards,
Sathish
Hi All,
ReplyDeleteI have implemented the above idea to my client. It's working fine. After a month they came with an following issue :
Microsoft Dynamics NAV
---------------------------
The Service Principal Name (Delegation) configuration has been set incorrectly. Server connect URL: "net.tcp://nav:7046/DynamicsNAV70/Service". SPN Identity: "DynamicsNAV/nav:7046"
The X.509 certificate CN=NavServiceCert is not in the trusted people store. The X.509 certificate CN=NavServiceCert chain building failed. The certificate that was used has a trust chain that cannot be verified. Replace the certificate or change the certificateValidationMode. The revocation function was unable to check revocation for the certificate.
Solution:
In the ClientUserSetting,
Change the property for ServicesCertificateValidationEnabled as FALSE.