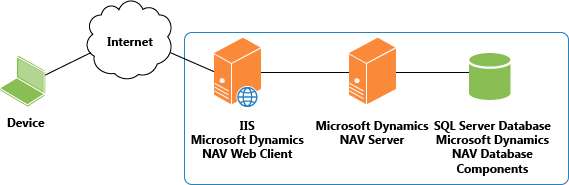
To deploy the Microsoft Dynamics NAV Web client, you install the
Microsoft Dynamics NAV Web Server components on a computer that is
running Internet Information Services (IIS). To access the
Microsoft Dynamics NAV Web client, you must have a web browser and
a network connection to a Microsoft Dynamics NAV Server instance
that connects to a Microsoft Dynamics NAV database. The following
illustration shows the components involved in the setup.
You can install Microsoft Dynamics NAV Web Server components on
the same computer as the Microsoft Dynamics NAV Server or on a
separate computer.
Troubleshooting the Microsoft Dynamics NAV Web Client Installation
| Note |
|---|
| You do not need a Microsoft Dynamics NAV Server instance or SQL
Server database to install the Microsoft Dynamics NAV Web Server
components. You can install these components separately and then
later configure the Microsoft Dynamics NAV Web Server components to
use them. Prerequisites |
-
Microsoft Dynamics NAV 2013 installation media. For example,
this could be a DVD or network drive that contains the Microsoft
Dynamics NAV 2013 installation files.
-
Verify that the system requirements are met on the computer that
you want to install Microsoft Dynamics NAV Web Server components.
For more information, see System Requirements for Microsoft
Dynamics NAV 2013.
-
Install Internet Information Services 7.0 at a minimum.
Make sure that the required features are enabled. For more information, see How to: Install and Configure Internet Information Services for Microsoft Dynamics NAV Web Client
Instead of installing and configuring IIS manually, you can use Microsoft Dynamics NAV Setup to install IIS and enable the required features. If IIS is already installed, then Setup will enable any required features that are not currently enabled.
Installing the Microsoft Dynamics NAV Web Server
To install the Microsoft Dynamics NAV Web client, you run
Microsoft Dynamics NAV Setup on a computer that is running IIS, and
then choose the Microsoft Dynamics NAV Web Server components
option.
To install Microsoft Dynamics NAV Web Server components using the Microsoft Dynamics NAV Setup wizard
To install Microsoft Dynamics NAV Web Server components using the Microsoft Dynamics NAV Setup wizard
-
On the computer that is running IIS, open the Microsoft Dynamics
NAV 2013 installation media.
-
Double-click the setup.exe file to start the Microsoft Dynamics
NAV Setup wizard.
If you have already installed one or more Microsoft Dynamics NAV components on the computer, you will see the Maintenance page instead of the Welcome page. In this case, choose Add or remove components, and then go to step 7.
-
Choose the Next button.
-
To accept the license terms, choose I accept.
-
On the Microsoft Dynamics NAV Setup page, choose
Choose an installation option.
-
On the Choose an Installation Option page, choose
Custom.
-
On the Customize the Installation page, choose the box
next to NAV Web Server Components, and then choose Run
from My Computer.
-
Choose Next to go to the Specify Parameters
page.
-
In the Server section, set the following parameters to
configure the Microsoft Dynamics NAV Server instance.
ParameterDescriptionServer NameSpecifies the name of the computer that is running Microsoft Dynamics NAV Server for this client.Client Services PortThe listening TCP port for the computer that is running Microsoft Dynamics NAV Server.Service NameThe name of the Microsoft Dynamics NAV Server instance to connect to.Note If you currently do not know the Microsoft Dynamics NAV Server instance or you want set up the Microsoft Dynamics NAV Server later, then use the default values.
-
In the Web Server Components section, set the Port
parameter to the TCP port to use for the Microsoft Dynamics NAV Web
client website.
-
If you want to add an item on the Start menu for opening
the Microsoft Dynamics NAV Web client, set the Add link to Start
menu parameter to Yes.
-
Set the Install IIS prerequisites parameter to one of the
following values.
ValueDescriptionInstallSetup enables IIS and the required features for the Microsoft Dynamics NAV Web client and installs the Microsoft Dynamics NAV Web Server components. If IIS is already enabled on the computer, then Setup enables any required features that are not currently enabled.DetectSetup detects whether IIS and the required features for the Microsoft Dynamics NAV Web client are enabled on the computer, and then does the following:o If the required IIS features are enabled, then Setup installs the Microsoft Dynamics NAV Web Server components.o If any IIS features are not enabled, then Setup does not install the Microsoft Dynamics NAV Web Server components and an error report is generated that lists the required features. You must enable the required features, and then run Setup again to install the Microsoft Dynamics NAV Web Server components.SkipSetup installs the Microsoft Dynamics NAV Web Server components without detecting whether IIS or the required features are enabled. Setup does not change the IIS setup. -
Verify the parameters, and then choose Apply to complete
the installation.
-
When Setup is completed, choose the Close button.
To open the Microsoft Dynamics NAV Web client
-
To open the Microsoft Dynamics NAV Web client from the computer
on which you installed the Microsoft Dynamics NAV Web Server
components, do one of the following:
- On the Start menu, choose All Programs, and then choose Microsoft Dynamics NAV 2013 Web Client.
- Open a web browser, and then in the address box, type http://localhost:port. Replace port with the TCP port number that you chose during Setup.
Next Steps
-
If Microsoft Dynamics NAV Web Server components was installed on
Windows 7, create an inbound rule in the Windows Firewall to allow
communication on the TCP port that you chose during Setup.
For more information, see How to: Create an Inbound Rule in Windows Firewall for the Port of Microsoft Dynamics NAV Web Client.
-
If the Microsoft Dynamics NAV Web client is installed on a
different computer than Microsoft Dynamics NAV Server, set up
delegation on Microsoft Dynamics NAV Server from the Microsoft
Dynamics NAV Web client.
For more information, see How to: Configure Delegation for Microsoft Dynamics NAV Web Client.
-
If you want to change the Microsoft Dynamics NAV Server instance
that the Microsoft Dynamics NAV Web client connects to, then modify
the web.config file for the Microsoft Dynamics NAV Web client
website.
For more information, see How to: Change the Microsoft Dynamics NAV Server for the Microsoft NAV Web Client.
-
If you want to help secure the communication with the Microsoft
Dynamics NAV Web client, configure SSL.
For more information, see How to: Configure SSL to Secure the Connection to Microsoft Dynamics NAV Web Client.
See Also
Concepts
Deploying the Microsoft Dynamics NAV Web ClientTroubleshooting the Microsoft Dynamics NAV Web Client Installation
Regards,
Sathish
No comments:
Post a Comment