Thursday, 17 July 2014

System.Data.SqlClient.SqlError -When Restoring a Database to SQL Server 2008

Today i tried to restore a database backup to SQL Server 2008 R2 and he got the following error


Msg 3176, Level 16, State 1, Line 1 File 'D:\SQL Server 2008 DBs\test01.mdf' is claimed by 'SCTA_ORG_SECOND'(3) and 'SCTA_ORGANIZATION'(1). The WITH MOVE clause can be used to relocate one or more files.
Msg 3013, Level 16, State 1, Line 1
RESTORE DATABASE is terminating abnormally

let's resolve this error then we will explain the reason of this error so at the same screen used for restoring database of Microsoft SQL Server Management Studio 


select Script Action to New Query Window as the above image so you will get the following T-SQL and here we will know the reason


RESTORE DATABASE [test01] FROM  DISK = N'D:\SCTA_Org2.bak' WITH  FILE = 1,
    MOVE N'SCTA_ORGANIZATION' TO N'D:\SQL Server 2008 DBs\test01.mdf',
    MOVE N'SCTA_ORG_SECOND' TO N'D:\SQL Server 2008 DBs\test01.MDF',
    MOVE N'SCTA_ORGANIZATION_log' TO N'D:\SQL Server 2008 DBs\test01_1.ldf',
    NOUNLOAD,  STATS = 10
GO

so you will notice there are two files of mdf with the same name so just change the name of second one to test02 or to test01.ndf ( different extension) then run the command and it's successfully restored.

so the logical answer for this error first test01.mdf is a primary data file and the second is the secondary data file but the extension and name are same so that way you have to change the name or extension of second file with any other name or extension.

Note: the extension is anything ( it can be .fad or .ndf but .ndf is best practice to determine what this file for for example .ldf for log file , .ndf  for secondary data files ..).

Finally : I think the original database backup come from SQL Server 2000 and maybe this behavior allowed in SQL Server 2000 or the name is a case sensitive ( test01.mdf not like test01.MDF).

Regards,
Sathish

Microsoft Dynamics NAV 2015 will be the next major release, due later in 2014

Microsoft Dynamics NAV GM Eric Tiden speaking at WPC 2014
Microsoft Dynamics NAV GM Eric Tiden speaking at WPC 2014  

Microsoft Dynamics NAV 2015 will be the next major release of the product, and it will offer easier upgrades, better integration with Microsoft products like Office 365, and add new mobile device support.

The NAV team confirmed today at Worldwide Partner Converence 2014 (WPC), revealing the name of the release after years of using the code name "Crete".

Microsoft Dynamics NAV roadmap at WPC 2014

Dynamics NAV general manager Eric Tiden highlighted key improvements like better upgrade tools that should complete upgrades in a weekend. The team will also be building stronger Office 365 and Power BI integration into the product.

The new release will also introduce a new Dynamics NAV tablet interface for Windows, iPad, and Android. The screenshot shared with the NAV partners in attendance seemed to demonstrate a consistent app experience across devices, but the speakers said more detail would be shared at Directions.

"[NAV 2015] is not going to disrupt you," Tiden told the WPC audience. "There are no groundbreaking architectural tools. But we are giving new tools to upgrade and manage data more quickly." He pointed to a NAV 2015 TAP customer, who had successfully upgraded to the new release from NAV 2013 R2 one day.

This promise of easier upgrades was well received by the NAV partners in attendance, winning some applause. Upgrades have consistently been a pain point for NAV 2013 R2, with high costs to complete technical tasks like updating reports.  NAV 2015 will include more of the upgrade tooling that partners have been asking for to help bring down the cost.

A Microsoft Dynamics NAV 2015 home page

A brief demo of NAV 2015 showed off a role-tailored home page that included "expressive tiles". These colored squares can indicate not just standard metrics but any business information that can be derived from NAV, said NAV team member Kurt Juvyns. They also include a color coded status bar across the top of each square, with color coding logic that can be defined for each tile.

Examples of the improved look and feel of document reports in Dynamics NAV 2015

Juvyns said that browser performance is also "significanty improved" in NAV 2015.
More details are coming this fall, the team said. They'll plan to do training and brief partners on the new release at the Directions US and Europe events.

Regards,
Sathish

Thursday, 10 July 2014

Cumulative Update 16 for Microsoft Dynamics NAV 2013 has been released


Cumulative update 16 includes all application and platform hotfixes and regulatory features that have been released for Microsoft Dynamics NAV 2013. 

The cumulative update includes hotfixes that apply to all countries and hotfixes specific to the following local versions:
  • AU - Australia
  • AT - Austria
  • BE - Belgium
  • CH - Switzerland
  • DE - Germany
  • DK - Denmark
  • ES - Spain
  • FI   - Finland
  • FR - France
  • IS  - Iceland
  • IT   - Italy
  • NA - North America
  • NL - Netherlands
  • NO - Norway
  • NZ - New Zealand
  • SE - Sweden
  • UK - United Kingdom

Where to find cumulative update 16

You can download cumulative update 16 from KB 2977472 – Cumulative Update 16 for Microsoft Dynamics NAV 2013 (Build 37201).

For a full list of all hotfixes included in cumulative updates for Microsoft Dynamics NAV 2013, see the following CustomerSource and PartnerSource pages: 

CustomerSource:
PartnerSource:

More Information

For more information about cumulative updates for Microsoft Dynamics NAV 2013, see Released Cumulative Updates for Microsoft Dynamics NAV 2013.

For a list of all release cumulative updates, see Released Cumulative Updates for Microsoft Dynamics NAV 2013.

Regards,
Sathish

Cumulative Update 9 for Microsoft Dynamics NAV 2013 R2 has been released


Cumulative update 9 includes all application and platform hotfixes and regulatory features that have been released for Microsoft Dynamics NAV 2013 R2. 

The cumulative update includes hotfixes that apply to all countries and hotfixes specific to the following local versions:
  • AU - Australia
  • AT - Austria
  • BE - Belgium
  • CH – Switzerland
  • CZ – Czech Republic (New)
  • DE - Germany
  • DK - Denmark
  • ES - Spain
  • FI  - Finland
  • FR - France
  • IS - Iceland
  • IT - Italy
  • NA - North America
  • NL - Netherlands
  • NO - Norway
  • NZ - New Zealand
  • RU – Russia
  • SE - Sweden
  • UK - United Kingdom
This cumulative update also introduces new application merge utilities: A new set of Windows PowerShell cmdlets that can help you through code upgrade.

You can use the new cmdlets to modify application object source files in the Microsoft Dynamics NAV 2013 R2 Development Shell, or by importing the Microsoft.Dynamics.NAV.Model.Tools.psd1 module into the Windows PowerShell Integration Script Environment (ISE). The new application merge utilities install when you choose the Developer option in Microsoft Dynamics NAV 2013 R2 Cumulative Update 9 Setup, or if you add the development environment to another installation option.

For more information, see the 

MicrosoftDynamicsNAV2013R2CU9_MergeApplicationObjectSourceFiles.pdf whitepaper, which is attached to this blog post. We will also write about the new cmdlets here on the blog.

Where to find cumulative update 9

You can download cumulative update 9 from KB 2977473 – Cumulative Update 8 for Microsoft Dynamics NAV 2013 R2 (Build 37221).

For a full list of all hotfixes included in cumulative updates for Microsoft Dynamics NAV 2013 R2, see the following CustomerSource and PartnerSource pages: 

CustomerSource:
PartnerSource

More Information

For more information about cumulative updates for Microsoft Dynamics NAV 2013 R2, see Announcement of update rollups for Microsoft Dynamics NAV 2013 R2. 

For a list of all release cumulative updates, see Released Cumulative Updates for Microsoft Dynamics NAV 2013 R2.


Regards,
Sathish

Tuesday, 1 July 2014

NAV 2013 Credential Type - How to Use?

Hi all,

Please do these activities when you have time, its a long activity and i would suggest do all activities in one go. So be clam and lets start.

I have installed NAV 2013 and its work great with my windows credentials.


I was checking the service console (Microsoft Dynamics NAV Administration) in NAV 2013 and found out that Credentials Type have multiple Options.


1) Windows (we use this as default and its works fine when we install default NAV 2013. We are using same after release of NAV 2009).

Other Options are - UserName, NavUserPassword and AccessControlService.

First of create a user under Administration/IT Administration/General/Users. As shown below how to create it.


I use UserName as TEST and Password as Manager@1. Provide Super Role to the Test User.

You will encounter with an error message when you try to save the Login as shown below.


Just click ok, we are getting this error because we haven't changed the service file yet.


Let's try to use the second option that is NavUserPassword in this article. All steps remain same for UserName too.

First of all i will change the Credentials Type in Service Console of NAV 2013 by editing the service as shown below.


After that try to stop and start the service. You will encounter with an error message -

Server Instance 'MicrosoftDynamicsNavServer$DynamicsNAV70' failed to reach  status 'Running' on this server due to the following error: 'Time out has expired and the operation has not been completed.'. Additional information may be in the event log of the server.


I checked the event viewer and here is what the detailed error i got -

Server instance: DynamicsNAV70
Session type: UnknownClient
Session ID: 0
User: 
Type: Microsoft.Dynamics.Nav.Types.NavConfigurationException
SuppressMessage: False
FatalityScope: None
Message: The required certificate thumbprint is not specified. Specify a valid value for the ClientServicesCertificateThumbprint configuration setting.
StackTrace:
     at Microsoft.Dynamics.Nav.Types.CertificateValidator.ValidateCertificateThumbprint(String thumbprint)
     at Microsoft.Dynamics.Nav.Types.CertificateHelper.GetCertificateFromThumbprint(String certificateThumbprint)
     at Microsoft.Dynamics.Nav.WindowsServices.NavServerWindowsService.CreateServiceHosts(ServerUserSettings settings, Boolean usePortSharing, String machineName)
     at Microsoft.Dynamics.Nav.WindowsServices.NavServerWindowsService.OnStart(String[] args)
Source: Microsoft.Dynamics.Nav.Types
HResult: -2146233088

It says that we need to specify ClientServicesCertificateThumbprint in the Service. Lets try to find where we need to specify it. I opened the service console and under client service i can see the Certificate thumbprint as shown below.


Let try to specify a value for the same.

Prerequisites -
1. Microsoft Management Console (MMC).
2. The makecert.exe utility.

If you do not already have this (MMC) snap-in installed, then follow these steps:
1. Choose Start, choose Run, and then type Mmc.exe.
2. In the console, on the File menu, choose Add/Remove Snap-in.
3. In the Add Standalone Snap-in dialog box, select Certificates, choose Computer Account, choose Local Computer, and then choose Add.


The makecert.exe utility is installed with Microsoft Visual Studio and Microsoft Windows SDK.

To create a root CA and a private key file by using the makecert.exe utility.

1. On the computer running Microsoft Dynamics NAV Server, create a temporary folder to use when you work with certificates.
2. Open the command prompt as follows:

If you have Visual Studio installed on your computer, choose Start, choose All Programs, choose Microsoft Visual Studio 2010, choose Visual Studio Tools, and then right-click Visual Studio Command Prompt and choose Run as Administrator.


3. Type the following command.
makecert -n "CN=RootNavServiceCA" -r -sv RootNavServiceCA.pvk RootNavServiceCA.cer

When you are prompted, enter a password. You need this password to create the service certificate.

The RootNavServiceCA.cer certificate file and the RootNavServiceCA.pvk private key are saved in your temporary folder.

To use the Certificates snap-in to install the root CA on the computer running Microsoft Dynamics NAV Server -

1. Start the Certificates snap-in for MMC on the computer running Microsoft Dynamics NAV Server, and then add the Certificates snap-in. [Already Done]

2. In the Certificates snap-in dialog box, choose Computer account, and then choose Next.[Already Done]

3. In the Select Computer pane, choose Local computer: (the computer this console is running on), and then choose Finish. [Already Done]

4. Choose OK to close the Add or Remove Snap-ins dialog box. [Already Done]

5. In the left pane of MMC, expand the Certificates (Local Computer) node.

6. Expand the Trusted Root Certification Authorities node, right-click the Certificates subfolder, select All Tasks, and then choose Import.

7. In the Certificate Import Wizard, on the Welcome page, choose Next.

8. On the File to Import page, choose Browse.

9. Browse to the location of the RootNavServiceCA.cer certificate file, select the file, and then choose Open.

The default Location is C:\Windows\SysWOW64\RootNavServiceCA.cer.


10. On the File to Import page, choose Next.

11. On the Certificate Store page, accept the default selection, and then choose Next.

12. On the Completing the Certificate Import Wizard page, choose Finish.

13. The RootNavServiceCA certificate is now visible in the list of trusted root CAs.

14. You now create a certificate revocation list for the root certification authority and then install the certificate revocation list on the computer running Microsoft Dynamics NAV Server. A certificate revocation list is required because WCF applications check the revocation list when validating certificates.

To create a certificate revocation list for the root certification authority

At the command prompt, type the following command: (use same Visual Studio Command Prompt)
makecert -crl -n "CN=RootNavServiceCA" -r -sv RootNavServiceCA.pvk RootNavServiceCA.crl

When you are prompted, enter the password that you used to create the certificate.

To install the certificate revocation list on the computer running Microsoft Dynamics NAV Server -

1. In the Certificates snap-in, in the left pane of MMC, expand the Certificates (Local Computer) node.

2. Expand the Trusted Root Certification Authorities node, right-click the Certificates subfolder, select All Tasks, and then choose Import.

3. In the Certificate Import Wizard, on the Welcome page, choose Next.

4. On the File to Import page, choose Browse.

5. In the File Type field, select Certificate Revocation List (*.crl).

6. Browse to the location of the RootNavServiceCA.crl file, select the file, and then choose Open.


7. On the File to Import page, choose Next.

8. On the Certificate Store page, accept the default selection, and then choose Next.

9. On the Completing the Certificate Import Wizard page, choose Finish.

10. Select the Trusted Root Certificate Authorities node, and then refresh the snap-in.

A Certificate Revocation List folder that contains the RootNavServiceCA.crl file has been created.


To create and install a test certificate for the Microsoft Dynamics NAV Server computer -

1. At the command prompt, type the following command:

makecert -sk NavServiceCert -iv RootNavServiceCA.pvk -n "CN=NavServiceCert" -ic RootNavServiceCA.cer -sr localmachine -ss my -sky exchange -pe NavServiceCert.cer

This command specifies the subject’s certificate name as NavServiceCert. You need this certificate name when you configure the Microsoft Dynamics NAV Windows client or Microsoft Dynamics NAV Web Server components.

2. When you are prompted, enter the password that you used to create the root CA.

3. Select the Trusted Root Certificate Authorities node, and then refresh the snap-in.

To grant access to the certificate’s private key to the service account for Microsoft Dynamics NAV Server -

1. In the left pane of MMC, expand the Certificates (Local Computer) node, expand the Personal node, and then select the Certificates subfolder.

2. In the right pane, right-click the NavServiceCert certificate, choose All Tasks, and then choose Manage Private Keys.

3. In the Permissions for NavServiceCert private keys dialog box, choose Add.

In the Select Users, Computers, Service Accounts, or Groups dialog box, enter the name of the service account that is used by Microsoft Dynamics NAV Server By default, the service account is NETWORK SERVICE. Choose OK when done.


In the Permissions for NavServiceCert private keys dialog box, select the account, and then select the Allow check box next to Full Control. Choose OK when done.

In the right pane, double-click the NavServiceCert certificate.

In the Certificate dialog box, choose the Details tab, and then select the Thumbprint field.

Copy or note the value of the Thumbprint field. (Make Sure you only copy the value as the Thumbprint value have a space in the start as shown in image below)


Paste the value in service as shown below.


Start the service and walla service started succesfully.

Now let's try opening Role Tailored Client (Windows Client).

What the Hell we are getting an error saying - There is a communication protocol mismatch between the client and the server.


And the worst part is that there is nothing on the Event viewer also.

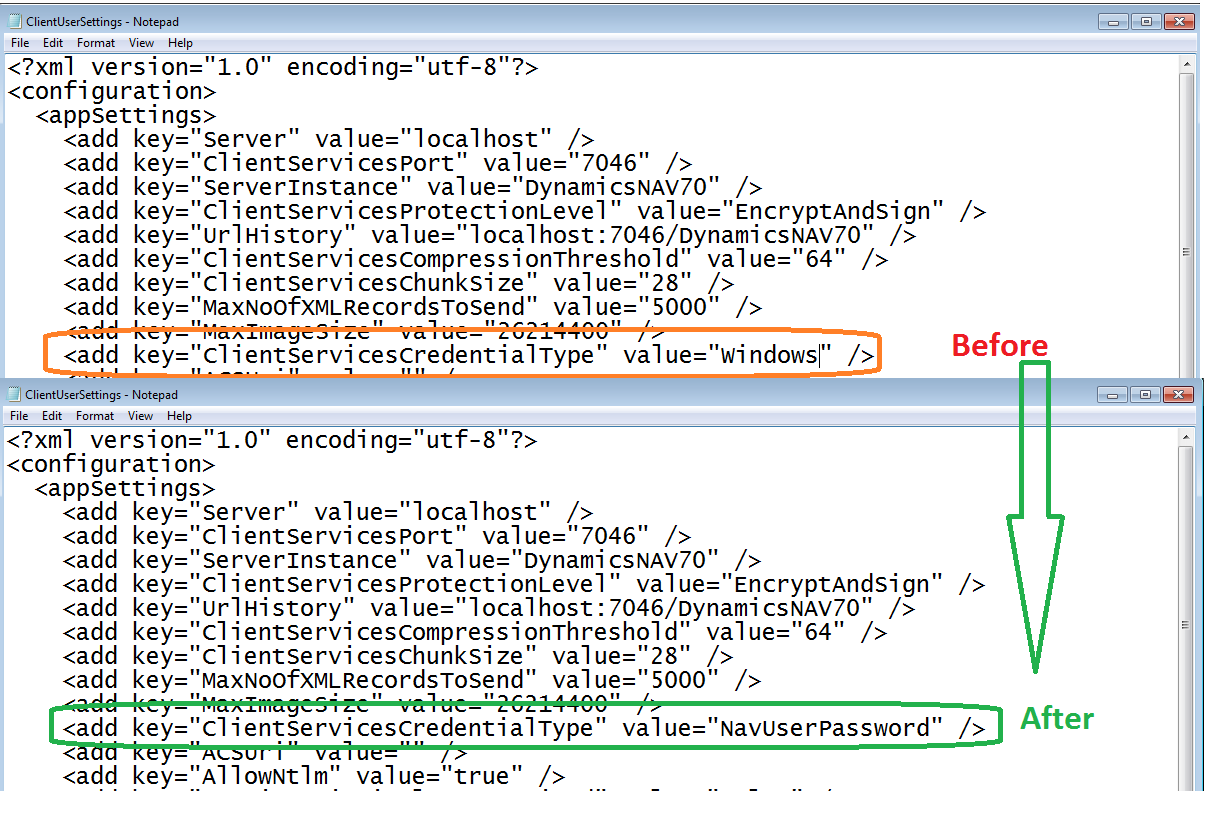
Oh! i missed one more configuration file that reside under users in c. Let's stop the service and open the ClientUserSettings file.

The path for file is - C:\Users\<user name>\AppData\Roaming\Microsoft\Microsoft Dynamics NAV\70

When i opened the file, i figured out that ClientServicesCredentialType is still windows. Lets try to change it to NavUserPassword.


Save the file, start the service and start the client.

Wow the RTC Client Connected and its asking for user name and password.


When i entered username and password, clicked ok. But what i am getting an error.


The error message also suggest the solution.It says we need to put the Certificate Name in DNSIDENTITY.

so where is it? It in the ClientUserSetting, open the file and enter the certificate name in the DNSIdentity Value as shown below.


Now lets start the client and its started successfully as shown below.


Reference: http://saurav-nav.blogspot.in/

Regards,
Sathish

Friday, 27 June 2014

How Do I - Series for NAV 2013 R2 Updated...

Hi all,

Microsoft have updated new videos on HOW DO I Series for NAV 2013 R2. Below are the link for new videos available on MSDN.

Thanks Microsoft MVP's for the HDI Series.

IF you are looking for Previously Released HDI Series Videos Please Refer Below Links.

>> From 01 To 26 Videos.     

>> From 27 To  42 Videos.

Below are the Links for New Videos.


Let's go through the videos and learn new things in NAV 2013 R2.
 
Reference:http://saurav-nav.blogspot.in

Regards,
Sathish

How Do I - Series for NAV 2013 R2 Updated

Hi all,

Microsoft have updated new videos on HOW DO I Series for NAV 2013 R2.

Below are the link for new videos available on MSDN.

For Last 26 Videos Link Please refer to the Post here.

Below are the Links for New Videos.

 27. How Do I : SEPA One-off Direct Debit Collections in Microsoft Dynamics NAV 2013 R2

28.How Do I : Manage Users in Windows PowerShell with Microsoft Dynamics NAV 2013 R2

29.How Do I : Deploy the Help Server in Microsoft Dynamics NAV 2013 R2

30.How Do I : Create Windows PowerShell scripts for Microsoft Dynamics NAV 2013 R2

31.How Do I : Get Started with Windows PowerShell for Microsoft Dynamics NAV 2013 R2

32.How Do I : Use the Debugger in Microsoft Dynamics NAV 2013 R2

33.How Do I : SEPA Recurring Direct Debit Collections in Microsoft Dynamics NAV 2013 R2

34.How Do I : Do Full SQL Tracing for Microsoft Dynamics NAV 2013 R2

35.How Do I : Manage Objects in Microsoft Dynamics NAV 2013 R2 Development Environment from the Command Prompt

36.How Do I : Monitor a Microsoft Dynamics NAV 2013 R2 Server Instance using Event Tracing

37.How Do I : Enable and Verify Single Sign-on with Office 365 in Microsoft Dynamics NAV 2013 R2 using Best Practice Analyzer and Windows PowerShell

38.How Do I : Export Payment Data to an Electronic Bank File in Microsoft Dynamics NAV 2013 R2

39.How Do I : Set Up Web Client, Windows Client, NAS, and Web Services on Separate Service Tiers in Microsoft Dynamics NAV 2013 R2

40.How Do I : Import a Variable-Column-Number Text File Using an XMLport in Microsoft Dynamics NAV 2013 R2

41.How Do I : Set Up the Job Queue in Microsoft Dynamics NAV 2013 R2

42.How Do I : Create a Matrix Page in Microsoft Dynamics NAV 2013 R2

Let's go through the videos and learn new things in NAV 2013 R2.

Regards,
Sathish